Setting Up and Using Ring Alarm Outdoor Contact Sensor
The Ring Alarm Outdoor Contact Sensor is designed to monitor your outdoor windows and doors, as well as gates and sheds.
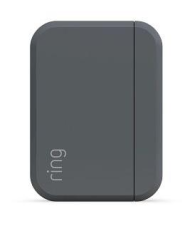
The Outdoor Contact Sensor is made up of two parts — the sensor and the magnet — and when installed on your door or window, it can tell if the door or window is open or closed.
During setup, you can choose if you want the Outdoor Contact Sensor to only send open and closed alerts, or if you want it to be armed when Ring Alarm is in Home or Away Mode.1
2Ring Alarm and all Ring Alarm accessories require a compatible Ring subscription (sold separately) for digital arming/disarming and certain other in-app features.
Outdoor Contact Sensor Features:
- Armed Modes:When armed, the Outdoor Contact Sensor will trigger your Ring Alarm Base Station (Ring Alarm Base Station is sold separately) if a door or window is opened. You can customize your Sensor Mode settings.1
- Entry and Exit Delay:If your Outdoor Contact Sensor Placement is set to Main Door, you can customize your entry and exit delays to have enough time to leave after arming, or enter and disarm.1
- Bypass sensors:If an Outdoor Contact Sensor is open or offline at the time of arming, or if you want to leave a window open, you can bypass the Outdoor Contact Sensor to leave it unarmed.
- Alexa Routines:Use your Outdoor Contact Sensors to trigger Alexa routines.
- Alerts and History:Get alerts when a Sensor is opened, and review Sensor activity history1in the app.
Outdoor Contact Sensor Specifications:
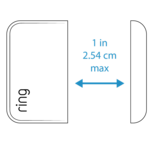
 | • Sensor and magnet can be up to 1“ apart when the Sensor is closed for easier mounting. • Mounting tape, screws and anchors provided in the box. • Uses 2 AA batteries • Uses Z-Wave to communicate with the Base Station • Requires the Ring Alarm Base Station |
Outdoor Contact Sensor Placement Settings:
If you selected “Trigger Alarm” during setup, you’ll need to select one of the three placement settings below. If you selected “Send Alerts Only” during setup and later change the Outdoor Contact Sensor’s Mode Settings to be armed in either Home or Away mode,1 the placement setting will default to Main Door. To change the placement setting, go to the Outdoor Contact Sensor’s device details page and tap on the Device Settings tile, then find “Placement Setting” in the list.
- Main Door:For use on doors you enter and exit from most often. When arming Ring Alarm in Away mode,1you’ll have a customizable Exit Delay that allows you to exit from that door. When armed, opening the door with this sensor will trigger the Entry Delay so you can disarm before the alarm sounds.
- Secondary Door:For use on doors you don’t use to enter and exit when armed. When armed, Ring Alarm will sound immediately when opened.
- Window:For use on windows only. When armed, Ring Alarm will sound immediately when opened.
Where can I install Outdoor Contact Sensors?
There are many entry points where Outdoor Contact Sensors can be used to secure your home, including:
- Entry points in fences and gates
- Sheds and garages
- Doors and windows that may be exposed to the weather and climate
What should I watch out for when deciding where to mount an Outdoor Contact Sensor?
- Make sure that the sensor is not too far away from the Base Station.
- Check that when the door, window, or gate is closed, the space between the Sensor and magnet are 1 inch or less
- There needs to be at least 1/2" of space so you can slide the cover open to change the batteries.


Outdoor Contact Sensor Setup
- Disarm your Ring Alarm.
Open the Ring app to the main dashboard.
Tap Set Up a Device at the bottom of the screen.
- TapSecurity.
- TapSensors,and find theOutdoor Contact Sensor.
Follow the in-app instructions to complete setup.
How do I replace the batteries in my Outdoor Contact Sensor?
1. Slide the Sensor off of the bracket and then remove the battery compartment cover |  |
2. Replace the batteries with fresh AA alkaline batteries. | |
3. Ensure that the batteries are inserted correctly. When inserting batteries, make sure the (+) is correctly matched to the diagram. |  |
WARNING: Inserting the battery with the wrong polarity may damage the device.
